Weston Middle School
Technology/EngineeringCourse Materials
Often we need to maintain a device or system ( or even part of the body) at a given set point. Examples of such set points include:
- Temperature of a house
- Blood Sugar level
- Speed of a car
- Course of a car
- Light level in the eye
A feedback loop measures the output of the system, and feeds this information back into the system to enable it to maintain the set point.
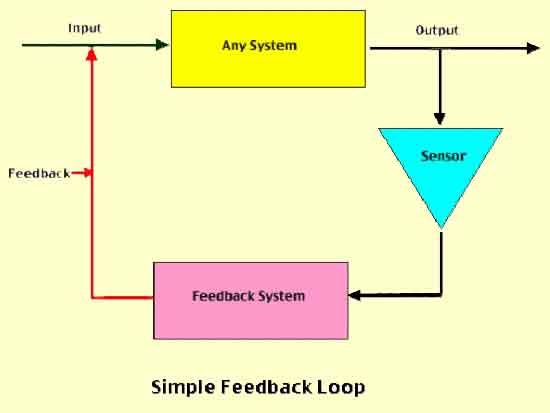
For example, if a house is too cold, a thermostat measures the output of the system( the room temperature), and turns the furnace on until the temperature reaches the set point.
A cruise control on a car adjusts the throttle to maintain a constant speed on long highway trips.
Grades( A, B,. C etc) in school are intended to give informational feedback about what students are learning. This information should be used to determine what concepts need to be reviewed by the student or re-taught by the teacher.
Rumble strips on the edges of highways give sleepy drivers audible feedback about their position on the road.
Much of our body is governed by feedback loops controlled by the autonomic nervous system-
- Iris changes size to let in more or less light to eye
- Heart
Rate/Breathing regulated to maintain constant oxygen level
Sweating/shivering/blood vessel dilation and constriction regulate body temperature. - Water reabsorption in kidneys is regulated to maintain constant salt concentration in blood.
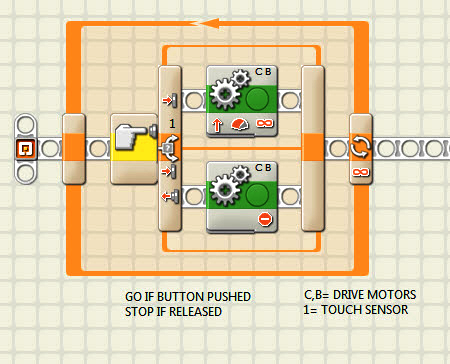
Introduction to the Switch:
Attach a touch sensor to Port 1. Program the Robot to go if the touch sensor is pushed, and stop if the touch sensor is released:
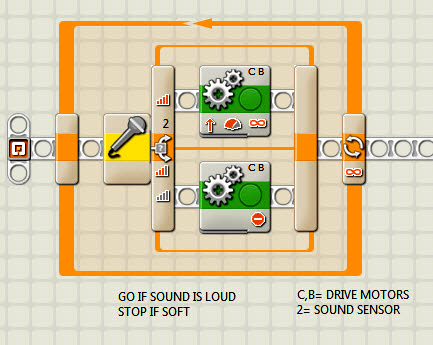
Using a sound sensor:
 :
:
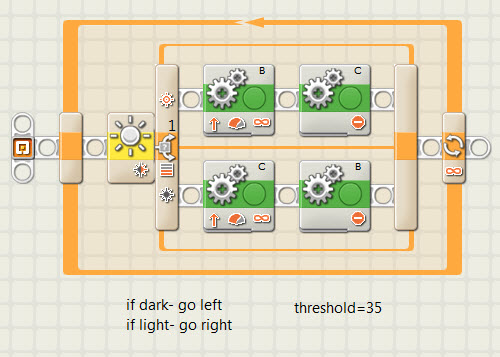
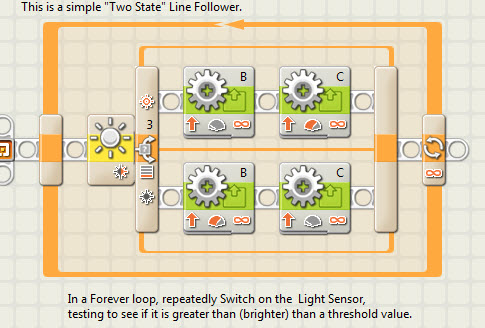
Line Follower Exercise( a feedback loop): Program Robot to follow an edge by veering left and right using a switch embedded in a loop.
Algorithm: If on white, turn right; if on black turn left (turn with one motor)
The above program works, but slowly-- the robot is only using one motor at a time!
By giving the 'off' motor some power, in the program below, we get more speed. But as we increase the proportion of power given to this motor, we are less able to navigate tight turns-- there is a trade-ff of speed versus agility.
Three
things in this program can be easily adjusted
to adjust for your robot and the driving conditions:
1. Light threshold
value: As explained below left, set the Light Sensor Block's "Compare"
number to the average of the min and max expected light readings.
This will adjust the program to the actual brightness seen on the surface
in the room used.
2. Maximum speed. In the two "fast" Motor blocks, the Power level used determines the maximum speed of the robot. If the maximum speed is too high, the robot will miss tight turns.
3. Turning
tightness. In the two "slow" Motor bocks, the Power level used
determimes how tightly the robot is able to turn. Lower Power here will
allow the robot to take tighter turns, whereas higher power here will
allow faster and smoother driving
over staight portions of the line.
Video Tutorial: Using Switches
Advanced: Proportional line Follower Tutorial
Use View to determine light threshold.
Extension: Add the color sensor on to the robot as well.
Program the robot to stop for 5 seconds at each station( colored square).
Links
sing a switch embedded in a loop.