Weston Middle School
Technology/EngineeringCourse Materials
Steps:
1) Messing About:
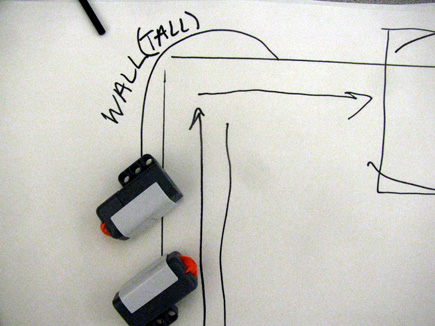
- Build a simple ramp that will allow the ball to move along without power. It should incorporate at least 3 turns.
- Attach a motor to the base horizontally, then another vertically.
- Construct 3 mechanisms( you may refer to the model mechanisms). Now, motorize the mechanisms.
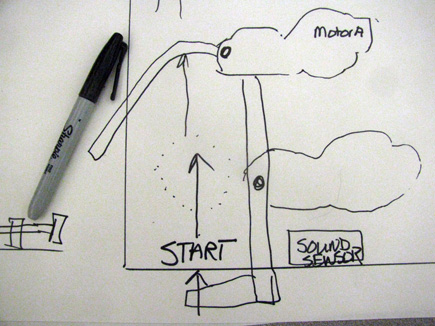
2) Planning Sketch:
- Brainstorm ideas, then sketch a diagram that describes the movement of the ball.
- Divide the system into a series of modules.
- Each module should have a mechanism that moves the ball , set in motion by a trigger mechanism controlled by a sensor.
3) Build Mechanisms:
4) Build Ramps:
5) Install Sensors:
6) Program:
Modules from different work groups can be combined!
Label everything! Your ideas might change as you begin to work, but at least you will have a starting place. Remember, you may consult idea library and, if necessary, hire a consultant to help you along!
Think about:
With limited motors, how can you have 2 different mechanisms controlled by 1 motor?
Gears will not only help with strength and speed needs, but also getting motion from one place to another.
Remember the gear walls! Pulleys also help.
If you plan to combine your projects with another group(s), begin your plan at the connection point(s) and work backwards!
2. Start building. Start programming at the same time so that you can test the project as you build it. Use wood (and cardboard) beams and tracks where possible in order to conserve limited Lego beams. Think efficiency! A truss is far more stable and efficient than stacking up bricks.
Sound Alerts and Visuals on NXT:
As an example, the NXT can (1) instruct the operator what to do (i.e., say “Go!” (2) Give audible/visual feedback when program reaches various points make specific sounds. The program might end with “bye bye.”
Earning Credit: 2 Requirements
1. Fully annotated program ( which should be printed and copied to teacher’s drop box) which includes:
• Names
• Story
• Code
• Algorithm
• Ports
• Sensors, including thresholds, etc.
• Sounds
• Visuals2. Project Presentation
Before turning the system on, briefly review the path of the ball and what sensors trigger the motors and mechanisms. You might want to tell what gave you trouble and how you solved the problem (or not).
Then, let it rip! Turn the system on! You may say more if you feel it is important, but keep it brief.
Your project will be video recorded and included in our video library as a resource for other students.
Some work
will be posted on YouTube.
Links